Andersons Man Cave

Andersons Man Cave
Entrance to the cave

Wednesday, 16 September 2015

Some more videos!

Hi all,

Recently took delivery of an Eureka HUB Set and also fitted our 4520 and 42101 with authentic Loksound chips from Mike at DCCSound, took them for a spin and also took some videos. Would have preferred an unweathered HUB Set but it looks great nonetheless! Excuse the quality of the videos, taken quickly with my personal phone.


Enjoy!

Monday, 31 August 2015

Videos

Hi All,

Have uploaded some videos to YouTube of some of the new additions to the fleet. Quality isn't great as they were taken using my Samsung S5 Phone however you get the idea!


Till next time!

Thursday, 20 August 2015

Flashing ditch lights for your GT46C-ACe

Hi all,

With Auscision's recent release of the GT46C-ACe class locomotives I thought I'd put up a bit of a tutorial (information gathered thanks to Mike Walters from DCCSound) on how to get the ditch lights to alternate with the horn button on DCC. Bit of a disclaimer first, I do not take any responsibility for any damage caused to your loco or DCC chip/system especially if something goes kapoot or catches fire, however I highly doubt that will happen if you follow the instructions to the letter ;)

First things first. Out of the box the GT46 was meant to have this feature pre-programmed into the circuit board however it doesn't work out so well and you end up with this photo here...


What you're seeing is F0 selected for the headlights and F1 selected for the ditchlights. Problem is only one works, and when you press F2 the ditchlight on the long hood end turns on. So I needed a fix, and thankfully Mike helped me out! Please keep in mind that I have fitted my GT46's with LokPilot decoders and do not know if it will work with other brand of decoders. Also I have performed all of this on my Digitrax system using OPS programming on the mainline (same method you'd use for changing the CV's for speed matching). So how do you do it? The following CV's need to be changed in exactly this order, reading left to right. 

CV31 = 16, 
CV32 = 2
----------------------
CV394 =  20
CV396 = 128
CV410 =  40
CV412 = 128

CV32 = 3
----------------------
CV426 =  20
CV442 =  40

CV32 = 0
----------------------
CV275 =   9
CV279 =   2
CV291 =   9
CV295 =   3
CV283 =   9
CV287 =   2
CV299 =   9
CV303 =   3

If you've entered these correctly, your new functions will be:
F1 = Headlights and marker lights On/Off
F2 = Enables flashing ditchlights
F11 = Ditchlights On/Off

These are directional, so will work both ways. The end product should look something like this:


We're yet to receive our TT/LDP/SSR's so I'm unsure if the problem has been fixed since the SCT was released in March, however I doubt it has and so this tutorial applies to those models as well. If theres any questions please feel free to leave a comment, and any constructive criticism on how to do this differently or improve them would be greatly appreciated!

Till next time! 

Thursday, 9 July 2015

Databases

Hi all,

Thought I'd post something on here that may or may not interest a few people depending on the size of their collection, and that is recording your collection onto a database. The purpose of this in the beginning for us was to just have a record on file of what we have just in case something happened to the collection and for insurance reasons, however as the collection has grown considerably over time, so has the detail put into the database. What started as just what the item was and it's price has extended to DCC code, whether its been weathered or fitted with sound, expected resale value and so on. A request from our insurer was to have photo evidence of what we have to ensure it was insured for the right price, so that's when I looked into setting up a photo database, where you just click on the item and a picture of it appears. The whole thing is then put on a DVD (About 4GB worth of photos) and given to the insurance company so they can see exactly what we have. So far our database just includes locos and rollingstock, however one day we may add in track, points, point motors, buildings, signals, etc. Rollingstock is separated across a few pages rather than one massive one, and categorised to make it easier to read. First I'll start with a couple of screengrabs of the file structure so you can see how its working behind the scenes.


Inside the initial folder.


Inside the rollingstock folder showing the different sections.


Inside the VR category, showing all the photos with their code and number as the name of the photo.


How it looks in excel. The code/number is hyperlinked to the corresponding photo, and a simple click on one of the blue links brings up a photo of that item.


Each piece of rollingstock is categorised into origin, owner and type of commodity. Other information includes brand, Kit or RTR, livery, loaded (and with what) or unloaded, buy and sale price, weathering and any other relevant comments (eg. fitted with ETM).


Here's our loco page. Extra info here includes type of mech, DCC Code, livery (colour coded) and extra comments such as sound, owned by etc. The list on the right is stuff we have sold over the years for record keeping purposes.


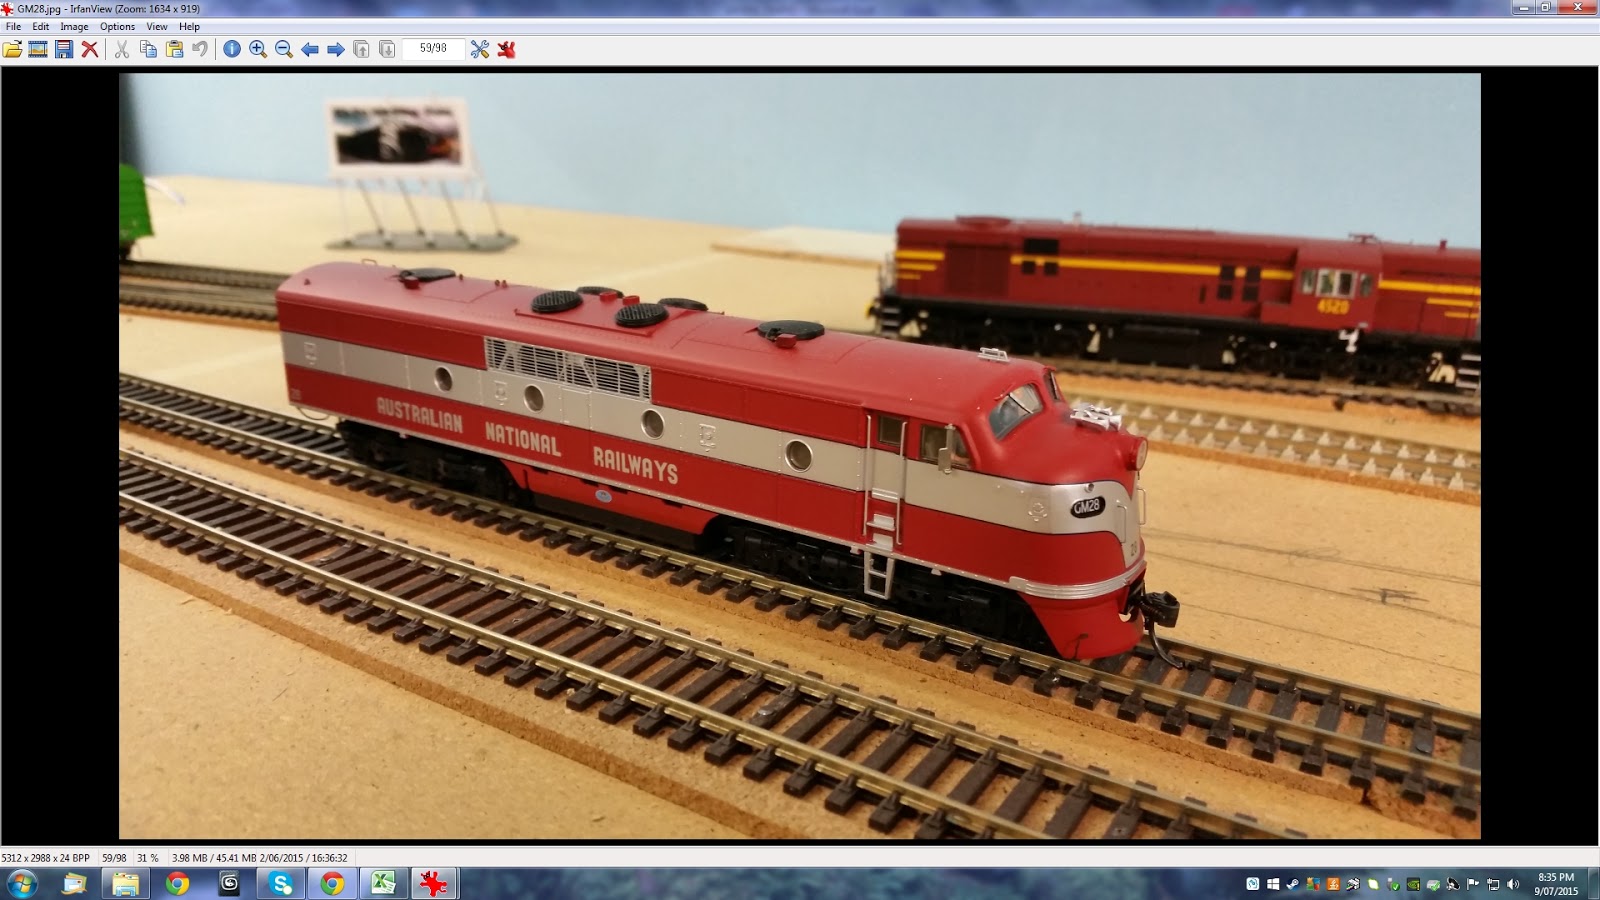
Testing the theory, clicking on 'GM28' brings up this photo of the corresponding model. Also included in our database is a list of products on order including their expected release date and how much has been paid off, which is great to remind you what you're waiting on! There's also a 'wanted' list, which includes anything not ordered but wanted eventually. 

Any comments/recommendations are very welcome, it's not perfect but it works for us, however would love to hear how to make it better or how other people have set up their databases.

Till next time!

Saturday, 18 April 2015

Time for some modelling!

Hi all,

Been a long time since the last update! Ended up selling the Austrains 81's on evilBay and have ordered 3 SDS ones with sound instead, so that project was scraped. Latest additions to the fleet include the Auscision SCT's picked up at Sandown, two VR Electric L Class's and an Auscision 4520 as preserved in Tuscan. Oh and of course, the SRM VLocity fitted with a DCCSound chip from Mike Walters. Have also sold a lot of rollingstock to make way for future additions, including our Lima Overland set, NSWGR FS cars, Kitbashed Lima tankers and a number of C and X Class locos. Still working out whether I'll put my WCR S Cars up for sale, just don't want to let them go!

On to the layout. A lot of work has been completed since the last update, including the container/steel terminal and the Pacific National EDI loco depot. The whole shed has also been cleaned from rubbish, the plastering completed and is now ready for scenery! Or maybe time to do some modelling/weathering of which a lot has been put on the backburner. Off to the photos, have taken a few so sit back and enjoy. All of our rollingstock is out on the track as well now.

Where all the magic happens! Programming/DC Test track nearly up and running.
SCT Sidings.
SCT Loco depot.
Main lines on the left, loop roads on the right. Container/Steel Terminal on the very right.
Pacific National EDI Loco Depot.
Another angle.
Main junction before the bridge. Can access all tracks from here, outside loop road is Dual Gauge, extension over the bridge goes to the Way and Works sidings.. 
Points allowing access to the container/steel terminal. SG loop as well, allowing trains to cross even if something is pulling out of the terminal.
Passenger bank sidings.
Opposite side. Sadliers siding on the SG in the background. Future branch extension seen on the right hand side, currently known as 'The Jump'.
Fuel and Cement sidings, loco depot in the background.
Close up.
Looking down the mirror of the storage sidings underneath.
Lots of trains!
Storage sidings access road, Quarry siding and Mill siding.
Way and works sidings, lots of stuff on the backburner that needs fixing!
Mini loco depot in the container terminal, much like North Dynon.
Happy Modelling!

Saturday, 22 November 2014

Testing

Hi all,

Another update from the mancave. Cleaned up the SCT sidings so decided to give them a rollingstock test, and everything went to plan which was great to see. Was asked to provide a diagram by a person on facebook however haven't managed to do one yet however hopefully I'll have one soon. Couple of happy snaps: 


A shed will cover the 4 roads on the right, with the middle two roads allowing access for the Greater Freighters. The container wagons are sitting in the container loading road (has a set of points up both ends in case a run-around is required). 


Up the other end of the yard we have the headshunt on the right, two storage roads in the middle and the loco depot on the left. Depot will have a shed plus refueling facilities. As you can see the train just fits, so a couple of refrigerated wagons will complete the train.


Another look at the storage sidings underneath. Main thing down here is to ensure theres no derailments as it will be a PITA to get something that's derailed in the back roads!


Looking down the mirror.


Last photo of the day. This is a cheap way to keep your track clean, a tip we picked up from the guy who runs EFD Simply Glues at the Sydney exhibition last year. Using your standard track cleaning rubber is good to get the gritty stuff off the track however it leaves a residue which can cause poor electrical pickup as well as dirty wheels. All this is is a cheap disposable razor (buy them in packs of 50 from the $2 shop) and a piece of felt that has a sticky side (bought in long strips and then cut to size, sticks straight on). Then pour some of the EFD Track cleaning fluid on and away you go! Haven't had any troubles with this method so far. If anyone else has some track cleaning tips or tricks please share! 

Saturday, 15 November 2014

Working Around

Hi all,

Some more cleaning has been done in the past few weeks and we are now about 60-70% of the way around. Decided to do some testing while we were at it as a few sidings have been modified from the original plan. Here's the Apex pulling out of the siding (an operation which blocks all lines, as is in real life).


Finally we can see some track! This photo shows the SCT sidings on the right. Gap in the BG is for a station.


Bit of work has been done in the 'scenic' section, supports for the track now in place permanently.


Showing the Apex siding on the left, station on the right and a creek up the middle.


Till next time!